"Django Stripe," "Stripe integration," "Stripe API," and "Django Stripe integration" are phrases that are trending in the Google browser lately.
Since the topic of the Django framework is familiar to us – we have written about it in the articles "WordPress vs. Django" and "Applications written in Django" – this time, we decided to show its capabilities from a more practical perspective.
The topic of payments on the Internet is book-sized. As customers, we know it very well. Names such as PayPal, PayU, Przelewy24, Blik, DotPay, TPay, Apple Pay, and Google Pay function in public awareness.
The Stripe brand has joined the ranks of operators, platforms, gateways, and payment processors. It is recognized as one of the world's largest and most established Payment Service Providers (PSP).
The list of brands supported by Stripe includes Amazon, Google, Spotify, and Uber, among others.
When we talk about gateways, payment card operators, and payment processors, questions arise about how to use such services, the technological and software challenges posed by such integration, and methods for a quick and efficient way to do such integration.
And here, we arrive at the beginning, namely the integration of Stripe payments in Django. So, let's take a look at how to integrate Stripe payment gateway with a web application (e.g., an online store or a B2B platform).
So, without further ado, we invite you to read the article!
What is Stripe payment?
Let's start with the most fundamental questions: What is Stripe? What is Stripe payment?
Stripe is a platform that offers online payment processing. It also supports credit cards.
It's simply an intermediary between the customer (e.g., of an online store) and the seller, between the buyer's and seller's banks.
Is it another gateway, like so many, on the USA market? Not necessarily, but we'll talk about the details in a moment.
Stripe offers a service that guarantees both parties a fast, easy, and, above all, secure transaction.
As a payment service provider, Stripe offers multiple payment methods – including deferred payments or recurring billing.
Completing a particular transaction, obviously, involves making a payment.
Stripe's reach sets it apart from the rest of the competition.
The U.S.-based brand offers support for more than 130 currencies, making it an optimal solution for companies that sell their products to international markets.
Stripe is ideal for companies where offering payments in foreign currencies is an important part of competing. For those for whom currency exchanges are a daily practice, a necessity, and a daily worry about the cost of currency conversions.
In terms of currency conversion costs, Stripe is considered a very competitive and attractively affordable solution.
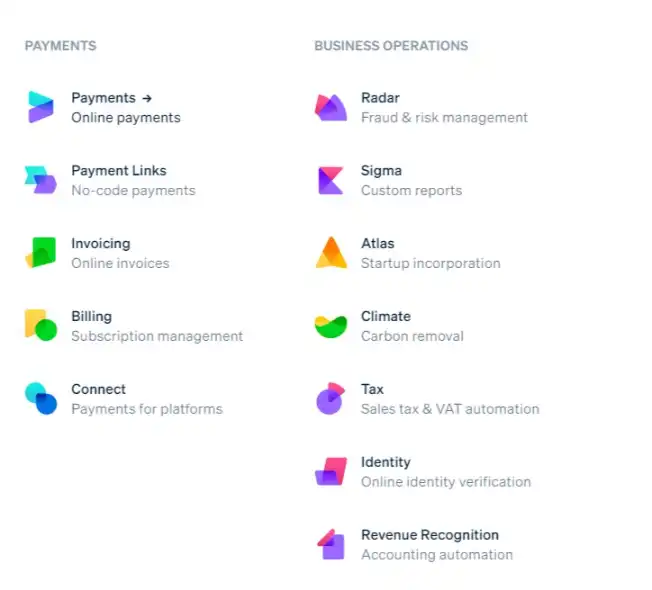
Stripe offers payment processing in various business models, including:
- E-Commerce (B2C)
- Platform B2B
- Virtual Wallet
- Fund-raisers
- Support of non-profit organizations
- Software as a Service (SaaS)
In addition, Stripe's Payments API supports the majority of universal payment systems, namely:
- Alipay
- Apple Pay
- Google Pay
- WeChat Pay.
Stripe in Poland
Stripe, available in Poland since 2019, offers Polish customers payment processing and a range of functionalities that automate, speed up, and simplify accounting and billing.
With Stripe, making payments on mobile devices and through POS (Point of Sale) systems is also possible.
What also sets Stripe apart from competitors is that it offers special security features and takes great care to ensure the safety of transactions, which are much more vulnerable to cyberattacks on a global scale than on a national scale.
Stripe based the security measures primarily on the following:
- AVS – Address Verification Service
- SSL encryption
- CVV/CVV2 control
- Meeting PCI DSS standards (Payment Card Industry Data Security Standard).
Address verification is used to compare the address provided by the customer with the address provided by the bank.
Stripe also meets the highly rigorous standards of the Payment Card Industry Security Standards Council.
Organization of credit card operators that since 2014 has been developing, standardizing, and enforcing the use of standards for cyber-security, particularly the security of financial transactions. To be precise, Stripe has received the highest level of payment processing security (PCI Service Provider Level 1).
Stripe has also introduced its own fraud detection tools (Stripe Radar), which, through Machine Learning, can assess the credibility and honesty of a person completing the transaction.
Stripe Radar is an integral part of the platform and requires no installation or additional configuration. It's a solution offered by default.
Stripe availability in Germany, Austria, and Switzerland
Stripe is available in 46 countries. Among them are the USA, Germany, Austria, and Switzerland.
All of the supported countries have access to core functionalities. However, some features are restricted to certain regions or available only in a beta version.
For example, the full version of the Stripe Terminal service for accepting in-person payments is only accessible in Germany and the USA. The beta version is available for Austria and Switzerland (see the full list here).
However, the Instant Payouts for Connect marketplaces and platforms are only available in the USA, Canada, Singapore, and the United Kingdom.
Some features are invite-only, such as additional identity verification.
Therefore, if we decide to use Stripe, we should read their documentation carefully because that's where all the information on the availability of all their products is. Thanks to that, we can see the whole array of options we can access and use.
Stripe integration in the USA
Competing directly and with great success with PayPal, Stripe is a tool that gains more and more market share.
As we mentioned, it's present in several dozen countries and also offers currency conversion services on very attractive terms.
When it comes to the American market, Srtipe offers a special benefit for customers in the Stripe Atlas program, which also allows us to set up a business in the United States.
Having headquarters in the United States for many organizations will provide a very convenient, fast, legal, and formally correct tool to quickly enter and operate in the US market as a full-fledged and legal entity.
Thanks to its compact, bundled nature, a number of functionalities (we can find a full list of features here), and solutions available within Stripe Atlas help reduce the cost of entering a new market.
Additionally, Stripe offers some USA-only functions that include, among others, cross-border payouts and crypto payouts in the beta version. Both features allow platforms in the USA to pay out to connected accounts. The difference is that cross-border payouts are available for Express and Custom accounts, while crypto payouts are only available for Express accounts.
Why should we use Stripe?
A measure of the quality of the services, products, programs, and solutions offered by Stripe is its:
- Fast and easy integration process – the registration and verification process is pretty quick and doesn't require meeting very restrictive criteria.
- The integrated system within which various forms of payment processing are possible.
- Flexibility and adaptability of Stripe APIs to individual needs.
- Extensive libraries that provide developers with functionalities along with documentation.
- Advanced reporting tools.
Stripe's online payment types
Stripe's distinguishing feature is its API, which enables quick, relatively simple implementation of payments on a website, mobile app, or other software.
A wide range of options allows users to choose the most suitable option for their Stripe business model.
Currently, Stripe offers three types of online payments:
- Stripe Payment Links – with it, it is possible to create a completely independent payment page and make it available on any channel (on a website subpage, social media, etc.). This option allows us to create one payment for one product in one currency without writing an API integration.
- Stripe Checkout
- Stripe Elements
- Subscriptions.
Stripe Checkout
Stripe Checkout is a low-code payment integration that is recommended for users who do not need to make payments on their own website and have no objections to conducting the payment process on a dedicated Stripe checkout page.
Stripe Checkout was created to make payment services more accessible to companies without programming expertise who would like to do the implementation themselves.
Stripe Checkout is designed to make the payment process as smooth and seamless as possible.
The functionality supports the user in the data entry process and detects errors in real time.
Moreover, the Stripe Checkout offers:
- Address auto-completion
- 1-Click Payment
- Real-Time Card Validation
- Descriptive error messages
- Credit/debit card operator identification.
Stripe Checkout allows us to create a Stripe-hosted payment site with no programming knowledge and no code.
To implement payments on the website, we only need to configure payments and copy and paste the appropriate code snippet into our site's content management system (CMS). It follows a similar principle to how analytical systems code is pasted.
Stripe Checkout manages the entire payment process without having to create a form on the website.
Stripe Checkout has its limitations, but it also has many practical features. Among other things, it supports using promotional codes and different language versions.
If you would like to read more about Stripe Checkout and how to integrate it to accept one-time payments, we highly recommend the article "Integrate Stripe Payments with Django By Building a Digital Products Selling App."
Stripe Elements
Suppose, for various reasons, that payments should be made without redirection to an external provider's site. In that case, we should choose Stripe Elements, which allows us to create our own dedicated payment forms using custom user interface components.
While Stripe Elements allows us to customize the appearance of payment forms, it also requires some coding on our part. Those using this option can sell different products at different prices.
Subscriptions (recurring payments) in Stripe
In addition to single transactions, Stripe also offers Recurring Payments, which are most commonly used for SaaS and PaaS services.
With Stripe, we can easily implement a subscription fee-based business model in our application.
This is done without the need for a complex interface and logic that is necessary for the user to handle recurring payments conveniently.
And we would like to use this example of subscription support to show how to easily and pleasantly start your adventure with Stripe in applications based on the Django framework.
Payment integration in Django
Recurring payments, by definition, are more complicated than single transactions. They're inherently asynchronous, and what is asynchronous usually requires more work and is more difficult to test and later maintain.
In the remainder of this article, we'll show how to implement a subscription model in a Django-based application while explaining the basics of Stripe workflow.
We won't cover the basics of Django here, such as view creation, routing, or configuration. We assume you are a Python developer and have created more than one application in Django. So, let's focus on the interesting thing – Stripe.
Disclaimer:
The code shown below must not be used in the production version of an application.
In this snippet of code, we do not include error and exception handling, and we do not customize security requirements, which are often individual.
We also left out many scenarios and use cases of a smaller significance. The task we set for ourselves in preparing the following code is to show the general principles of integration of Stripe in a Django application.
Our team would never use such code in the production version of an application.
Preparation
We can work on an existing Django application or create a new project – the integration will not require us to make any complicated changes to the architecture or install dependencies that will interfere with the application.
The only thing we need to add to our virtual environment is the official `stripe` library for Python:
pip install stripe
The next step will be to create a Stripe account. The registration process itself is straightforward and requires no additional comments, especially since we aren't making a production account, and additional business verification won't be necessary.
Instead, we need to perform the following steps after registration in order to work with the Stripe API (you will not find information about this in the official documentation, and we would like to save you the time of investigating the causes of errors):
- Name the company by clicking on the top left corner next to the Activate account button.
- Fill in the links on the terms of service and privacy policy of our account settings (Settings > Billing > Customer portal).
We will also need the Stripe CLI tool for further testing, which makes working in a local environment much more pleasant. How? You can find out in this article: https://stripe.com/docs/stripe-cli
Next, we need to add to the settings of our Django application two parameters necessary to communicate with the Stripe API. The naming of the setting keys is not essential and should be treated as a suggestion:
STRIPE_API_KEY = ********
STRIPE_HOOKS_SECRET = ********
We can get the value for `STRIPE_API_KEY` by going to Developers > API keys in the Stripe dashboard and copying the Secret key value. We will fill in `STRIPE_HOOKS_SECRET` later, and at this stage, we can set it to an empty character string.
The final step will be to create test data in our Stripe account. For this, you can use a simple Django CLI command that will create a product and three subscription packages:
import stripe
from django.conf import settings
from django.core.management import BaseCommand

class Command(BaseCommand):
    def handle(self, *args, **options):
        stripe.api_key = settings.STRIPE_API_KEY
        product = stripe.Product.create(name='Awesome Service')
        for i in range(1, 4):
            stripe.Price.create(
                product=product['id'],
                currency='usd',
                unit_amount=i * 1000,
                recurring={'interval': 'month'},
                lookup_key=f'service_{i}',
                nickname=f'Service level {i}',
            )
You can also create test data using the Stripe administration panel. Unfortunately, in the panel, we can't specify the `lookup_key` value for individual price packages, which causes some implementation issues since identification in queries will have to be based on the price package ID, which Stripe does not recommend.
We have the environment prepared and can move on to perform the integration itself.
Package selection view
We'll first create a simple view that allows the user to select the price package of our subscription and start the payment process.
In the view, we download all the pricing options for the first active product in our Stripe account:
def index(request):
    active_products = stripe.Product.list(active=True)
    prices = stripe.Price.list(product=active_products['data'][0]['id'])
    return render(request, 'subscriptions/index.html', {
        'prices': prices['data'],
    })
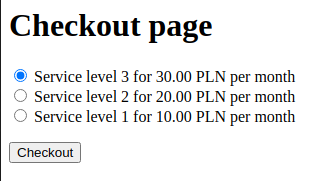
The view template is also very simple – we display a radio select for the user to choose a subscription package:
{% extends 'base.html' %}
{% block body %}
  <h1>Checkout page</h1>
  <form action="{% url 'create-checkout-session' %}" method="post">
    {% csrf_token %}
    {% for obj in prices %}
      {% widthratio obj.unit_amount 100 1 as price %}
      <label>
        <input type="radio" name="lookup_key" value="{{ obj.lookup_key }}" {% if forloop.first %}checked{% endif %}>
        {{ obj.nickname }} for {{ price|floatformat:2 }} {{ obj.currency|upper }} per {{ obj.recurring.interval }}
      </label><br>
    {% endfor %}
    <p>
      <button>Checkout</button>
    </p>
  </form>
{% endblock %}
The package selection form will be sent to the `create-checkout-session` view, which will be presented in the next step. We will display the view based on the price package data directly from the Stripe API, where the price is provided in cents, so we need to do a simple conversion.
Django templates don't provide the ability to perform division in templates, so to avoid writing our own tag, we will use the built-in `{% withration %}` tag, which corresponds to dividing the number of cents by 100.
When we enter the view address in the browser, we should get the following result:
Transaction initiation view
The selected price package (to be precise, the `lookup_key` of the selected package) is passed to this view via POST.
We retrieve the package ID, then open a Stripe checkout session and direct the user to the resulting generated URL, where the user is redirected to a Stripe-hosted payment page and makes a payment outside our system.
def create_checkout_session(request):
    prices = stripe.Price.list(
        lookup_keys=[request.POST['lookup_key']],
        expand=['data.product']
    )
    success_url = request.build_absolute_uri(reverse('success')) + '?session_id={CHECKOUT_SESSION_ID}'
    cancel_url = request.build_absolute_uri(reverse('cancel'))
    checkout_session = stripe.checkout.Session.create(
        payment_method_types=['card'],
        line_items=[{'price': prices.data[0].id, 'quantity': 1}],
        mode='subscription',
        success_url=success_url,
        cancel_url=cancel_url,
    )
    return redirect(checkout_session.url)
The `stripe.checkout.Session.create` method, in our case, should receive the following parameters:
- `payment_method_types` – list of payment methods available to the user
- `line_items` – a collection of pricelist items that will be included in the payment
- `mode` – payment mode, we are interested in recurring payment
- `success_url` – an URL to which the user will be redirected after successful payment. Be sure to include the placeholder `{CHECKOUT_SESSION_ID}`, which will be replaced on the Stripe side with the session key needed to obtain transaction and user data.
- `cancel_url` – URL to which the user will be redirected if the payment fails; for some reason, it can be the same as `success_url`.
After successful payment in Stripe, the user is redirected back to our application at the address indicated in the `success_url`. We will examine the view available at this address in the next step.
The successful payment view
The successful payment view is a success page that the user sees after a successful payment receives the `session_id` parameter in the query string (according to the template we passed in the previous step).
This is precisely the point at which we can link the `customer ID` from Stripe to our user in Django – it will be needed to receive user subscription events and `portal session` generation, which we'll talk about next.
To simplify things, we won't save the `customer ID`, but will pass it to the template, where we'll allow the user to proceed to subscription management in Stripe.
def success(request):
    checkout_session = stripe.checkout.Session.retrieve(request.GET['session_id'])
    return render(request, 'subscriptions/success.html', {
        'customer': checkout_session.customer,
    })
And here is the template code:
{% extends 'base.html' %}
{% block body %}
  <h1>Success!</h1>
  <form action="{% url 'create-portal-session' %}" method="post">
    {% csrf_token %}
    <input type="hidden" name="customer" value="{{ customer }}">
    <button>Manage your subscription</button>
  </form>
{% endblock %}
The transition to subscription management (customer portal) is done by sending the `customer ID` to the `create-portal-session` view, which is responsible for redirecting the user to the subscription profile in Stripe.
View of transition initiation to the user portal
Stripe provides a fast and convenient way to receive payments and allows us, without much work, to provide the user with a convenient and very powerful UI for managing their subscription, i.e., `customer portal`.
The customer portal is a completely independent and secure interface hosted by Stripe. To redirect the user to the portal, we need to generate a URL using `customer ID`, which is also what the view below is responsible for.
def create_portal_session(request):
    portal_session = stripe.billing_portal.Session.create(
        customer=request.POST['customer'],
        return_url=request.build_absolute_uri(reverse('subscriptions'))
    )
    return redirect(portal_session.url)
Asynchronicity, aka webhooks
The entire code we have written so far is only the initial subscription and only handles the first charge of the customer's card.
Instead, we would like to charge the user on a recurring basis and without their participation – after all, that's what subscription models are all about.
This is where webhooks, the event system that Stripe provides to developers, comes to the rescue.
Stripe generates a myriad of different events related to payment processing, subscription, document generation, and more. The distribution of events is done using the webhooks concept.
In a nutshell – Stripe, when an event occurs, triggers the URL indicated in the administration panel, to which all the event data is forwarded.
The template is straightforward and allows us to easily handle the asynchronous flow, which is a natural way to manage subscriptions and deferred payments.
Let's create a view that will receive events from Stripe, that is, our webhook handler:
@csrf_exempt
def webhooks(request):
    event = stripe.Webhook.construct_event(
        payload=request.body,
        sig_header=request.headers['stripe-signature'],
        secret=settings.STRIPE_HOOKS_SECRET
    )
    data = event['data']
    event_type = event['type']
    data_object = data['object']
    if event_type == 'invoice.paid':
        print(f'Renew customer: {data_object["customer"]}')
    elif event_type == 'customer.subscription.deleted':
        print(f'Cancel subscription: {data_object["customer"]}')
    return JsonResponse({'status': 'success'})
First, we need to fill in the value of the `STRIPE_HOOKS_SECRET` key in the configuration of our Django application, which we initially set to an empty character string.
We can get the value for this key from the Stripe panel, but to do so, we would have to open the access to the application to the world, which is not always convenient or secure.
As we mentioned at the beginning, the most challenging part of implementing asynchronous workflow is testing in a local environment. Stripe is positioning itself as a developer-friendly solution with a high level of DX.
In the arsenal of libraries and tools provided by Stripe, we will find everything that makes our daily life much easier and local work efficient and enjoyable. One such tool is Stripe CLI, which we should already have installed.
First, we need to log in using the Stripe CLI by executing the `stripe login` command. After logging in, we run the following command, which will redirect all hook calls to our local application without having to open our environment to the world:
stripe listen --forward-to <HOOKS_URL>
After executing the command, the console will display the key that we should enter into our configuration as `STRIPE_HOOKS_SECRET`.

From now on, all Stripe events will go directly to our view.
There are a lot of triggered events, but to show the general principle of integration in the sample code, we support only two types of events:
- `invoice.paid` – occurs at the time of subscription renewal and includes a `customer ID` so we can extend the validity of the user's account.
- `customer.subscription.deleted` – occurs when a user cancels a subscription; the data of such an event also include `customer ID`.
That's the long and short of it. With the presented solutions, we can easily build a full subscription service with virtually any logic.
Stripe payment integration in Django. Summary
Stripe is a powerful tool that allows us to shift the boundary of responsibility in handling payments onto the operator.
It provides a complete API so that we can build any flow for handling one-time and recurring payments.
At the same time, Stripe gives developers toolkits that allow them to handle the most common use cases with minimal effort while not closing the path to further customization of the software under development.
Integration of the official libraries provided by Stripe is intuitively simple, and the documentation, while outdated in some places compared to competing solutions, is very comprehensive and sensibly organized.
A good DX makes developers eager to delve into the nuances of integration, and implementation processes will contain fewer errors and run quickly and efficiently.
Thanks to its wide range of tools, Stripe will suit both small projects in the MVP phase, where cost and implementation time are crucial, as well as large, mature projects with complex workflows and payment processing logic tailored entirely to the project.
Stripe integrates perfectly with applications written using Django, which our team uses on a daily basis.
Disclaimer
The sample prices presented in the article do not constitute a commercial offer within the meaning of the Polish Civil Code.